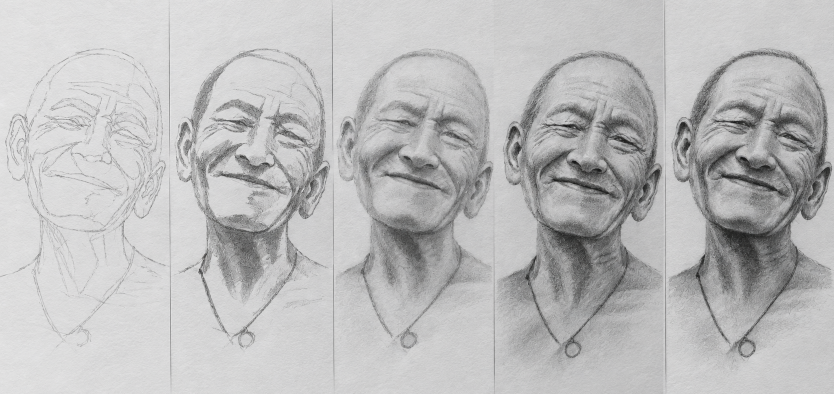
From the first outline to the final highlights, learn how to build a realistic pencil portrait through five simple stages.
Drawing a realistic portrait can feel overwhelming, especially when you look at a photograph and see hundreds of details, subtle shadows, and different shades of light.
Where should you start? Should you draw every detail first? How do you know where to add shadows? And how do you achieve smooth transitions without losing the depth of your drawing?
One approach that makes the process much easier is to break the portrait into smaller, manageable stages.
Rather than trying to draw everything at once, I like to build my graphite portraits gradually, working from the overall structure to the shadows, tonal transitions, contrast, and finally the highlights.
In this guide, I’ll walk you through the five stages of my drawing process, explaining what to focus on at each step and how each one contributes to the final result.
Before You Start: Learn to See Light and Shadow
Before putting pencil to paper, take a moment to study your reference photograph.
One of the most important skills in realistic portrait drawing is learning to see beyond facial features. Instead of focusing only on the eyes, nose, mouth, and hair, try to identify the areas receiving light and those falling into shadow.
Think of the face as a combination of different shapes and tonal areas.
Ask yourself:
- Where are the brightest areas?
- Where do the main shadows begin and end?
- Which areas contain the darkest values?
- How do the shadows define the shape of the face?
You don’t need to understand every subtle transition at this point. Start by identifying the larger shapes.
This simple observation will give you a much clearer direction before you begin drawing.
Stage 1: Establish the Contours and Main Shapes
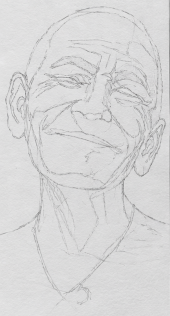
Every portrait begins with its structure.
At this stage, the goal is not to create volume or realistic shading. It is to establish the proportions and identify the main elements of the face.
Start with the general outline of the head, paying attention to its shape, angle, and proportions. Then gradually introduce the main facial features, including the eyes, eyebrows, nose, mouth, ears, and hair.
One particularly useful practice is to identify the boundaries of the main shadow areas and lightly mark their contours.
These boundaries will become your guide when you start applying graphite.
What to focus on:
- The overall shape and proportions of the head.
- The position and relationship between facial features.
- The main shapes of the hair.
- The boundaries between light and shadow.
A useful tip: Don’t rush this stage. Incorrect proportions can become increasingly difficult to correct once you start adding graphite and blending.
At the end of this stage, you should have a clear line drawing that defines both the portrait and the main areas that will receive shading.
Stage 2: Block in the Main Shadow Areas
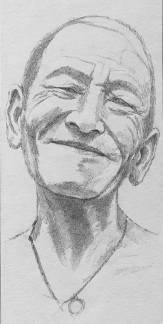
Now that the structure is established, it’s time to introduce graphite.
This is where the portrait starts to take shape.
Rather than shading the entire face gradually, begin by applying a consistent mid-dark graphite tone to the areas you identified as shadows during the first stage.
Think of these areas as separate shapes that you are filling in.
Depending on your reference, these may include:
- Shadows beneath the eyebrows and around the eyes.
- The sides of the nose.
- Areas beneath the nose and lower lip.
- Shadows along the cheeks and jawline.
- The area beneath the chin and around the neck.
- The darker sections of the hair.
Keep the areas receiving direct light mostly untouched, allowing the white paper to represent your brightest values.
At this point, don’t worry about making the shadows look smooth or realistic. Their boundaries should remain visible and clearly defined.
The goal is to establish the main shadow masses before introducing tonal transitions.
A useful way to think about this stage is that you are building the foundation of the portrait’s volume.
Stage 3: Blend and Build Tonal Transitions
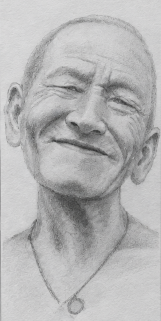
With the main shadow areas established, you can begin blending.
This is where the portrait starts developing a sense of depth and volume.
Using a blending stump or another suitable blending tool, gradually soften selected graphite areas, extending and spreading the graphite where necessary to create transitions between darker shadows and lighter areas.
Pay attention to how the face changes direction and how light interacts with its different surfaces.
For example:
- The cheek may transition gradually from shadow to light.
- The forehead may contain subtle tonal variations.
- The area around the nose requires more controlled transitions.
- The neck often contains broader areas of light and shadow.
The important thing is not to blend everything equally.
Some shadow boundaries should remain relatively defined, while others benefit from softer transitions. The reference photograph should guide these decisions.
A useful tip: Avoid over-blending. If every area becomes equally smooth, the portrait can lose its structure and contrast.
At the end of this stage, you should begin to see the facial features developing volume through different shades of graphite.
Stage 4: Restore the Darkest Values and Strengthen Contrast
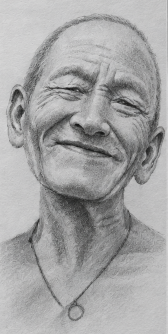
Blending often reduces the intensity of the original graphite, particularly in areas where you initially applied darker tones.
This is why I like to revisit the shadows after blending.
In this stage, identify the areas that need stronger contrast and carefully reapply graphite to restore their depth.
Pay particular attention to:
- The darkest sections of the hair.
- Pupils and upper eyelid areas.
- Eyebrows and nostrils.
- The inside of the mouth.
- Deep cast shadows beneath the chin.
- Other areas where the photograph shows particularly strong contrast.
You don’t need to darken every shadow again. Focus on the areas that genuinely require more depth.
This stage is important because contrast helps separate different facial features and creates a stronger sense of three-dimensionality.
Remember: A realistic portrait isn’t simply a collection of smooth grey areas. The relationship between light, midtones, and deep shadows is what gives it character.
Stage 5: Recover the Highlights and Refine the Details
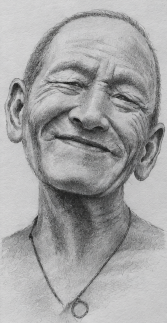
The final stage is about bringing back the light.
After building the shadows, blending the graphite, and restoring the darkest values, you can use an eraser to selectively lift graphite and recover the brightest areas.
A kneaded eraser is particularly useful for gently lifting graphite, while a precision eraser can help create smaller, more defined highlights.
Look for areas such as:
- Highlights on the forehead.
- The bridge and tip of the nose.
- Reflections on the cheeks.
- Highlights on the lips.
- Small reflections in the eyes.
- Light accents in the hair.
- Reflections on glasses, when present.
Not every portrait will have the same highlights. Let the reference photograph guide you.
Once the main highlights are established, take a step back and evaluate the entire drawing.
Are the darkest areas strong enough? Are the transitions natural? Do the highlights help define the facial features? Is the overall portrait balanced?
Make any final adjustments needed, but be careful not to overwork the drawing.
Sometimes, knowing when to stop is just as important as knowing what to add.
The Complete Process at a Glance
Although each portrait presents different challenges, this five-stage approach provides a consistent structure to follow.
| Stage | Main objective | What you should achieve |
|---|---|---|
| 1. Contours | Establish structure | Correct proportions and shadow boundaries |
| 2. Shadows | Apply initial graphite | Clearly defined shadow masses |
| 3. Blending | Create tonal transitions | Volume and softer gradations |
| 4. Dark values | Restore contrast | Depth and stronger definition |
| 5. Highlights | Recover light | Final luminosity and detail |
A Few Final Tips for Your Next Portrait
1. Don’t try to finish everything at once.
Work through each stage with a specific objective. This makes the process easier to manage and helps you avoid focusing on small details too early.
2. Protect your light areas.
The white of the paper is one of your most valuable tools. Be intentional about where you apply graphite, because recovering large bright areas later can be difficult.
3. Don’t overuse blending.
Blending is useful for creating smooth transitions, but it shouldn’t eliminate every defined shadow shape. A combination of soft and sharper transitions creates a more convincing portrait.
4. Keep comparing your drawing with the reference.
Step back frequently and look at the overall tonal balance. It’s easy to lose perspective when working too closely on individual details.
5. Remember that every portrait is different.
The five stages are a framework, not a strict formula. Some portraits require stronger shadows, others depend more on subtle transitions or carefully preserved highlights. Adapt the process to what you see.
Final Thoughts
For me, the most important part of drawing a realistic portrait is learning to break down what you see into manageable shapes, values, and transitions.
You don’t need to reproduce every detail of a photograph from the beginning. You need to understand its structure, recognize its shadows, build its tonal depth, and gradually bring the light back into the drawing.
By approaching each portrait one stage at a time, the process becomes more organized, less intimidating, and much easier to understand.
And most importantly, you begin to develop something beyond the ability to copy a photograph: the ability to observe, interpret, and translate what you see into a drawing.
Start with the shapes. Build the shadows. Find the light.
Happy drawing!